rtimv is an astronomical image viewer optimized for real-time image stream display. Works with MILK/CACAO shared memory image streams locally or via the milkzmq protocol. Will also display local FITS files, updating anytime the file is updated.
Basic Startup
There are two ways to start the rtimv window:
rtimv: local viewer process (reads images directly from shmim/FITS/mzmq keys).rtimvClient: client UI connected to a remotertimvServer.
The basic way to start either rtimv or rtimvClient is to provide a list of local stream names:
where each of the stream names corresponds to an image, e.g. image => /milk/shm/image.im.shm (but note that you only pass image). Order matters in this list, and it must be the last thing on the command line (after any options).
These (and many more) can also be specified in a configuration file, or with named command line options, as detailed below under Configuration.
For a camera named camname with an existing configuration file, start rtimv with
To start the remote client UI specifying the server:
Note the options shown are actually the defaults so you don't need to do this unless they are different.
You can also specify a config file like so:
but this is somewhat different than for local rtimv. This config file path will be passed to the server. But first, if that file exists locally it is read and used to configure the client first. Any differences between the client and server versions of that file are resolved in favor of the client.
Image Keys
The name and location of an image is specified by its key. The following rules are followed in the given order to determine how to find an image:
- If the
keyends in.fits,.fit,.FITS, or.FIT, then the image is treated as a FITS file stored on local disk withkeyspecifying a valid path. - if the
keyends in/, e.g./path/to/directory/, then rtimv will treat the FITS files in that directory as a cube, enabling playback and incrementing through the images in lexical sort order. - If the
keycontains@or:, or the configuration option--mzmq.always=true(-Z) is set, then thekeyis interpreted as amilkzmqaddress of the formname@server:port. Ifmzmq.alwaysis set, then@and:are optional. The default server islocalhostand the default port is5556. - Otherwise,
keyis treated as a localmilkshmimname and the standard path is followed, e.g./milk/shm/image.im.shmforkey=image.
Cube Mode
If a FITS file containing an image cube (NAXIS3 > 1) is opened, rtimv will automatically enter cube mode. This enables playback of the cube at varying speeds, as well as switching between frames.
Cube mode can also be entered by pointing rtimv at a directory containing multiple FITS files. This mode is entered anytime the image key ends in /.
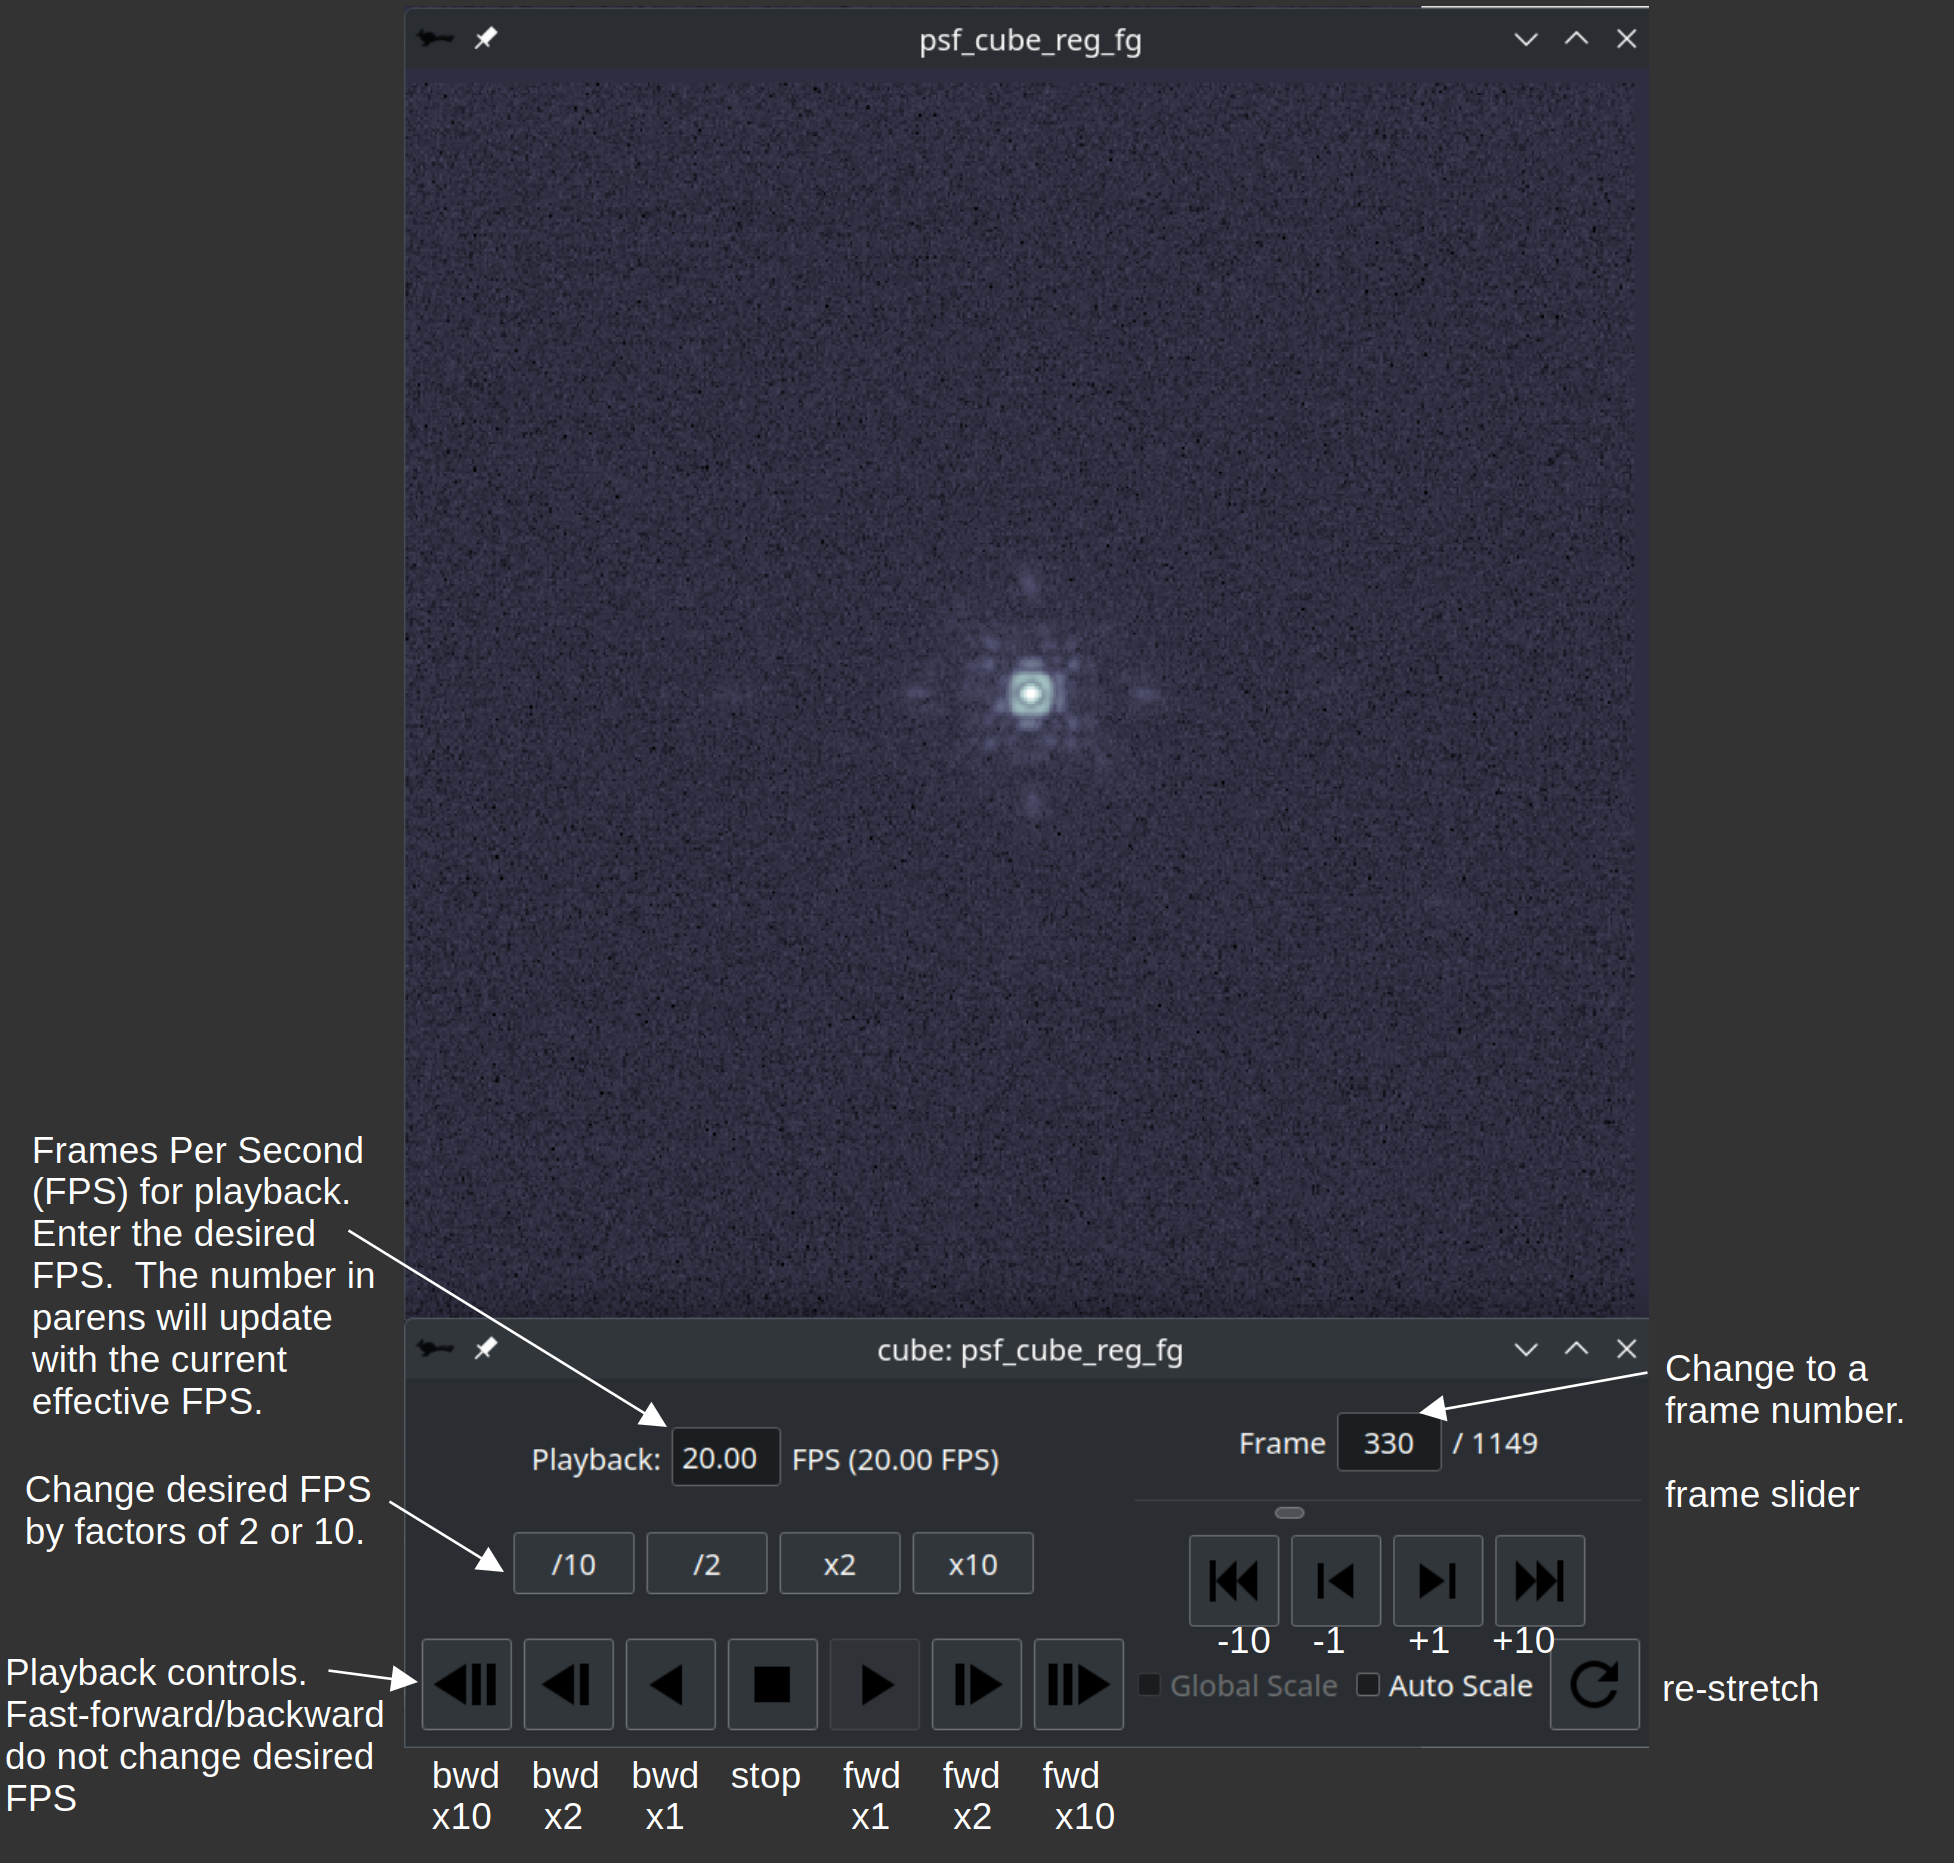
The FPS of playback in cube mode is determined both by the entered "desired" FPS, and the overal update timeout. The update timeout takes precedence to ensure that rtimv is responsive to image updates. This results in not necessarily obtaining the desired FPS for cube playback if FPS < 1/update_timeout. The cube control GUI will show the effective FPS compared to the desired FPS.
Cube playback and frame position controlled by the Cube Control GUI. This opens automatically when a cube is opened, and can be toggles with the C shortcut. The GUI is illustrated below.
Operating rtimv
rtimv lets you adjust color scales and draw shapes for interactive measurement of image features with keyboard shortcuts.
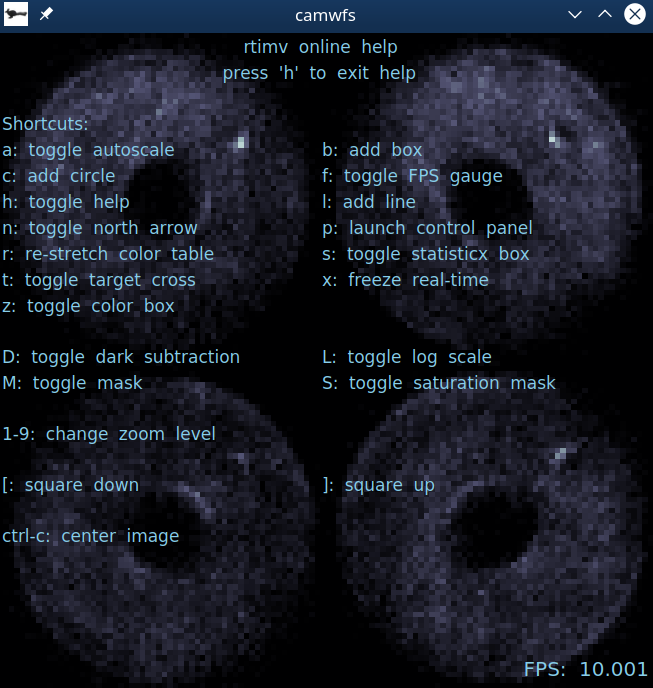
To access the help screen, type h after opening rtimv. The keyboard shortcuts are just the letters shown (without ctrl or alt) unless noted.
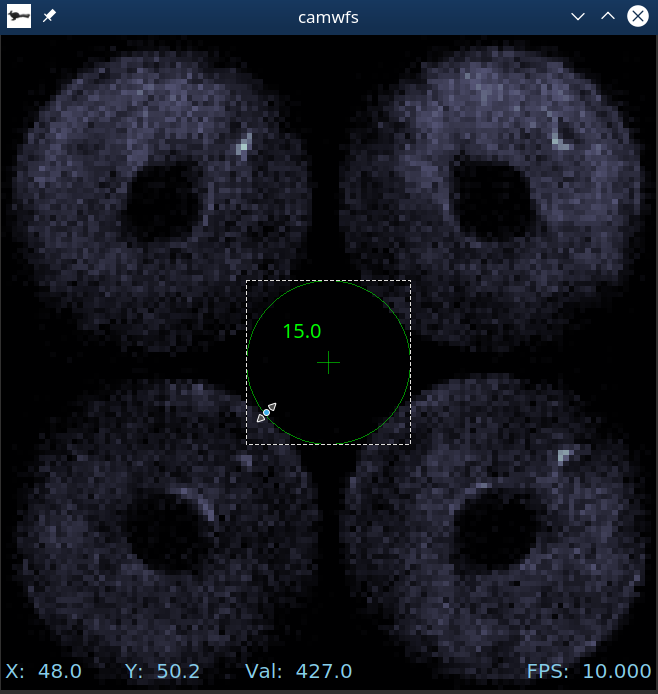
It is possible to add overlays of various shapes to measure distances and sizes. To add a circle, type c. You can drag to resize or reposition, and hit the delete key to remove. The number shown is the radius in pixels. (You can add another circle by hitting c again.)
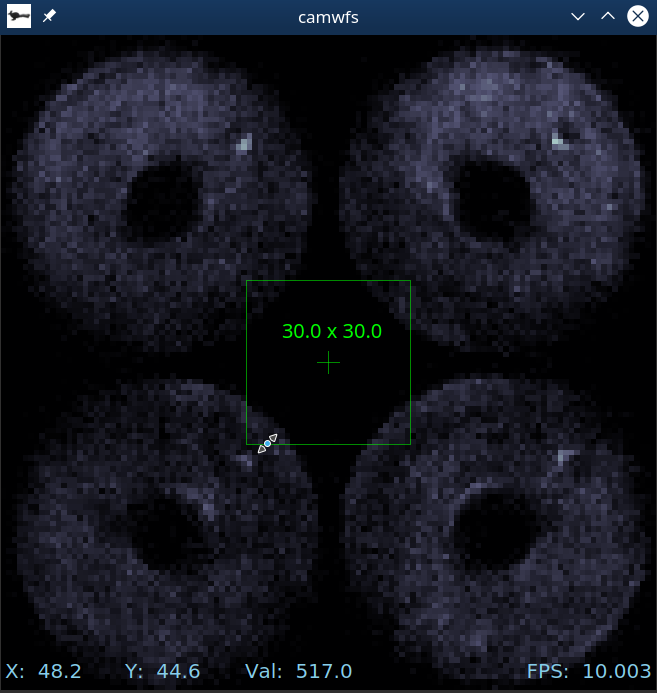
The b key adds a box, which works similarly. Dimensions shown are full-width by full-height.
You can also use l to add a line. The numbers shown are length @ direction where direction is degrees counter clockwise from North. (or straight up if North is not set). Clicking and and moving the mouse while in the middle rotates it. If you click and drag the opposite end from the small circle you can change the length and the angle.
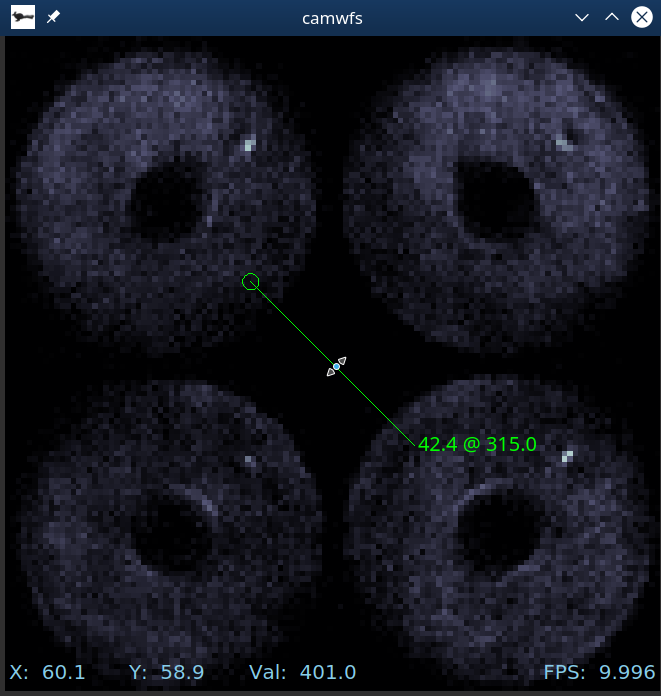
In general, if you see the "resize arrows" cursor when your mouse hovers over the shape, clicking and dragging will change the size. If you see the "hand" cursor, it will move the shape. Numbers, shape center indicators, and line end indicators are only shown when your mouse is over that shape.
Keyboard Shortcuts
| Key | Action | Description |
|---|---|---|
a | toggle autoscale | autoscale on will update the color table for each imge |
b | add a box | draw a box overlay and show its full width and height |
c | add a circle | draw a circle overlay and show its radius |
f | toggle the FPS gauge | |
h | toggle help screen | |
i | toggle info screan | |
l | add a line | draw a line overlay and show its length and angle relative to North |
n | toggle display of the North arrow | |
p | open control panel | |
r | re-stretch the display | reset the min/max in the color table using the current image |
s | toggle the statistics box | |
t | toggle the target cross | |
x | freeze the display | stop updating until x is pressed again |
z | toggle color box | the yellow box used for changing the color table limits based on the values inside it |
C | toggle cube control GUI | opens automatically if a cube is opened |
D | toggle dark subtraction | |
F | toggle spatial filtering | configure filters on the control panel |
L | toggle log scale | |
M | toggle the mask | |
S | toggle the sat-mask | |
1-9 | change the zoom level | |
[ | fit gui to image, decreasing size | |
] | fit gui to image, increasing size | |
ctrl+c | center the display |
Pixel Coordinates and Value
By default the current (x,y) pixel coordinate of the mouse pointer, and the image value under it, are displayed next to the mouse pointer. This can be turned off in configuration using --mouse.pointerCoords=true/false or with the control panel.
The mouse coordinates and value can also be displayed in a static location at the lower left of the window. This can be set in configuration using --mouse.staticCoords=true/false or with the control panel.
The displayed coordinate is for the center of a pixel, counting from 0,0 for the center of the lower left pixel. The center of the array (and default target-cross coordinate) is (0.5*(Nx-1), 0.5*(Ny-1)).
Configuration
rtimv and rtimvClient can both be configured from the command line or using a local config file. Above we showed the from with positional arguments for the keys. They can also be passed as option arguments:
or with a configuration file
where the options would be specified in the file as
Many more options are available.
Configuration With <tt>rtimvClient</tt> and <tt>rtimvServer</tt>
When using rtimvClient, there are two configuration scopes:
- Local client configuration (
rtimvClientcommand line and local-cfile). - Remote server-side configuration applied by
rtimvServer.
In practice, the precedence is:
rtimvClientcommand linertimvClientlocal config file (-c)- remote server configuration (used when local settings are not provided)
This means local client overrides always win for options/keys set locally, while remote configuration can still provide defaults (including image metadata shown in the window title/info panel).
Configuration Options
| Short | Long | Config-File | Type | Description |
|---|---|---|---|---|
-h | --help | bool | Print a help message and exit. | |
-c | --config | config | string | A local config file. If RTIMV_CONFIG_PATH is set that path will be used, otherwise this must be the full path. |
-S | --server | server | string | IP address of the rtimv grpc server. (rtimvClient only) |
-P | --port | port | int | Port of the rtimv grpc server. (rtimvClient only) |
--image.key | image.key | string | The main image key. Specifies the protocol, location, and name of the main image. | |
--dark.key | dark.key | string | The dark image key. Specifies the protocol, location, and name of the dark image. | |
--mask.key | mask.key | string | The mask image key. Specifies the protocol, location, and name of the mask image. | |
--satMask.key | satMask.key | string | The saturation mask image key. Specifies the protocol, location, and name of the saturation mask image. | |
--update.fps | update.fps | real | Specify the image update timeout in FPS. Overridden by update.timeout if set. | |
--update.timeout | update.timeout | real | Specify the image update timeout in ms. Default is 50 ms (20 FPS). Overrides update.fps. | |
--update.cubeFPS | update.cubeFPS | real | Specify the image cube update rate in FPS. Default is 20 FPS. | |
--autoscale | autoscale | bool | Set to turn autoscaling on at startup | |
--nofpsgage | nofpsgage | bool | Set to turn the fps gage off at startup | |
--darksub | darksub | bool | Set to false to turn off dark subtraction at startup. If a dark is supplied, darksub is otherwise on. | |
--satLevel | satLevel | float | The saturation level for this camera | |
--masksat | masksat | bool | Set to false to turn off sat-masking at startup. If a satMaks is supplied, masksat is otherwise on. | |
--targetXc | targetXc | float | The fractional x-coordinate of the target, 0<= x <=1 | |
--targetYc | targetYc | float | The fractional y-coordinate of the target, 0<= y <=1 | |
-Z | --mzmq.always | mzmq.always | bool | Set to make milkzmq the protocol for bare image names. Note that local shmims can not be used if this is set. |
-s | --mzmq.server | mzmq.server | string | The default server for milkzmq. The default default is localhost. This will be overridden by an image specific server specified in a key. |
-p | --mzmq.port | mzmq.port | int | The default port for milkzmq. The default default is 5556. This will be overridden by an image specific port specified in a key. |
--mouse.pointerCoords | mouse.pointerCoords | bool | Show or don't show the pointer coordinates. Default is true. | |
--mouse.staticCoords | mouse.staticCoords | bool | Show or don't show the static coordinates at bottom of display. Default is false. | |
--north.enabled | north.enabled | bool | Whether or not to enable the north arrow. Default is true. | |
--north.offset | north.offset | float | Offset in degrees c.c.w. to apply to the north angle. Default is 0. | |
--north.scale | north.scale | float | Scaling factor to apply to north angle to convert to degrees c.c.w. on the image. Default is -1. | |
--tools.lineWidth | tools.lineWidth | float | The width of lines in user items in screen pixels. Default is 2. | |
--tools.edgeTol | tools.edgeTol | float | The tolerance in screen pixels for the mouse to be on the edge of a user item. For closed shapes this applies only to the inside. Default is 5.5 | |
--tools.lineHeadRad | tools.lineHeadRad | float | The radius of the circle marking the head of a user line, in screen pixels. Default is 10. | |
--tools.crossWidthFract | tools.crossWidthFract | float | The half-width of the center cross, relative to the smallest dimension of the tools. Default is 0.1. | |
--tools.crossWidthMin | tools.crossWidthMin | float | The minimum half-width of the center cross, in screen pixels. Default is 5. | |
--tools.warningBorderWidth | tools.warningBorderWidth | float | The width of the warning border in screen pixels. Default is 5. |
The Config-File options of the form section.keyword specify the form
in the configuration file.
Settings on the command line override settings in the config file. So the same config file could be used for several images, changing only the image name on the command line for instance.
Config Path Environment Variable
For rtimv and rtimvClient, the environment variable RTIMV_CONFIG_PATH can be used to provide a base path for the config file named with -c/--config.
If RTIMV_CONFIG_PATH is set, the supplied config filename does not need to be an absolute path. The value of RTIMV_CONFIG_PATH is prepended to the filename provided with -c.
Server Configuration
rtimvServer is configured independently from the rtimv/rtimvClient window applications.
Typical startup is:
Server Configuration Options
| Short | Long | Config-File | Type | Description |
|---|---|---|---|---|
-h | --help | bool | Print a help message and exit. | |
-c | --config | config | string | A local config file. If RTIMV_CONFIG_PATH is set that path will be used, otherwise this must be the full path. |
-p | --server.port | server.port | int | Port the grpc server listens on. |
--server.address | server.address | string | Host/interface address the grpc server listens on. | |
--image.timeout | image.timeout | real | Time to wait for a new image to be ready before timing out, in s. Default is 1 s. | |
--image.sleep | image.sleep | int | Time to sleep while waiting for a new image, in ms. Default is 100 ms. | |
--client.sleep | client.sleep | real | Time in seconds after which a thread with no requests will be put to sleep. Default is 10 s. | |
--client.disconnect | client.disconnect | real | Time in seconds after which a thread with no requests will be disconnected. Default is 120 s. |
Example server configuration file:
Config Path Environment Variable
rtimvServer also uses RTIMV_CONFIG_PATH in the same way as the window applications: it prepends this path to the filename provided with -c/--config.
When rtimvServer is run under systemd, shell startup files (for example ~/.bashrc or ~/.bash_aliases) are not sourced automatically. For service-managed deployments, set RTIMV_CONFIG_PATH through the unit environment (for example via EnvironmentFile=). The installed unit defaults to: EnvironmentFile=-/etc/default/rtimvServer.
North Arrow
The north arrow is toggled on/off with the n key. If the angle of the north arrow is being updated (i.e. from a plugin that talks to the telescope) the value received is multiplied by a scale (e.g. -1 or 180/pi) and then an offset (in degrees) is added to the result to produce a counter clockwise (c.c.w.) rotation angle in degrees.
The north arrow can be disabled in configuration. If north.enabled=false is set, the north arrow will not be displayed.
Relevant configuration key=value pairs are
north.enabled=true/false: Whether or not to enable the north arrow. Default is true.north.offset=float: Offset in degrees c.c.w. to apply to the north angle. Default is 0.north.scale=float: Scaling factor to apply to north angle to convert to degrees c.c.w. on the image. Default is -1.